- Instructions for new users
- Software introduction
- Beginner guidance
- How to save SKP file as old version
- How to replace textures in SketchUp?
- How can I set the graphic card of higher performance to run JEGA Cloud Design?
- Account information setting
- Why is the font size too small/large in Jega Cloud Design?
- How to change the project name?
- How to upload a floor plan?
- Why are the previous projects missing?
- How do I switch back to the old version?
- How to draw a wavy line?
- Why is the ceiling not showing after placement?
- The layout display optimization of the canvas
- How do I hide the floor plan?
- How to cut a hole in the wall?
- Where can I find models and textures?
- Where can I find study materials?
- How to add doorways?
- How to perform software settings?
- How to view the shortcut keys?
- Why can't I rotate with the right-click?
- Why does it lag during operation?
- Computer configuration requirements for software use
- How to use tempanels?
- How to clear the browser cache?
- Freehand wall drawing
- How to modify the material of a finished model?
- How to cut a hole in the wall?
- Which browser should be used for using Sunvega?
- Which browser should be used for using Sunvega?
- Why are the shortcut keys not working?
- Start using
- Use basic software
- Combination model supports replacement function
- Material library - The material library pop-up box in customization is adaptive to the screen size
- How do designers upload models
- Instructions for creating folder categories for uploading
- Space type adds "Master Bathroom"
- Quick search / filter model
- Left navigation collapse/expand shortcut keys
- Add the shortcut key function for rotating the object by 45°
- Finished product locking and unlocking
- How to view the current version
- Mouse operation habit optimization
- Object toolbar optimization
- Design common shortcut keys
- How to set the transparency of the wall
- Optimize drag and object snap forces in 2D and 3D
- How to resize ornaments
- New history record
- How to make custom cabinets not be limited by craftsmanship
- "About" panel adds key information
- Collection logic optimization: Materials not authorized by the creator cannot be collected
- Style rendering optimization
- Camera settings
- Optimize the top menu
- How to delete unnecessary carcass panel
- How to quickly switch scenes
- My collection directory page, add custom directory sorting
- Finished product combination mirror image function
- How to save the project
- How to change the moving speed
- How to measure the distance on the floor plan
- Top menu adds a shortcut entry for the custom module
- Application effect to increase color temperature and brightness of the same product
- Set and hide the space name
- How to adjust the perspective
- Basic module supports placing ornaments in the cabinet
- Why doesn't the wall drawing adhere
- Object controls (movement, rotation, scaling)
- How to save the floor plan
- Custom shortcut keys
- Search Images by Image - Effect Optimization
- Q&A
- How to save local files
- Why is the operation stuck?
- How to make holes in the original ground
- Why is there no change even after adjusting the floor height
- Why was forced to log out
- What is the shortcut key for copy and paste
- How to add windows to circular arc walls
- Why does a prompt for a long time of no operation on the software pop up
- The splitting and merging of walls
- Why there is no ceiling
- https://www.aihouse.com/global/help-center/3d-home-design/1853
- Why does it prompt that it cannot be saved when clicking Save
- How to mirror the house type
- How to clear the browser cache
- Website User Guide
- Software introduction
- Premises
- Paint the wall
- How to draw an angled wall?
- How to create a circular hole?
- Hidden exterior wall setting
- How to display wall dimensions?
- How to edit wall shapes?
- How to make 3D fonts on the wall surface
- How to determine the position of a beam or a column?
- How to modify the height of a single space independently
- How to lock the wall
- Outer bulge drawing of the wall
- How to display the included angle of the wall
- How to select a single space for drawing
- How to modify the size of doors and windows
- How to quickly modify the materials of the wall or the floor
- Why doesn't the ground show
- How to solve the prompt of too large file when importing cad
- How to draw an arc-shaped wall
- How to draw a low wall
- How to modify the height of the wall
- How to draw the wall
- How to delete the wall
- How to modify the wrongly drawn wall
- How to adjust the length of the wall
- How to drag and draw rectangles to draw rooms
- How to upload CAD floor plan
- How to upload the floor plan image
- How to adjust the thickness of the wall
- Why is the wall transparent
- How to draw a mezzanine
- Doors and windows
- Design space
- Camera angle design
- Paint the wall
- Design materials
- Texture
- How to add/change the ground material
- Where is the wood grain texture map
- How to delete the divider line
- How to divide the area
- How to draw the skirting line
- Where is the metal texture mapping
- Where is the leather texture mapping
- How to replace the material color of the finished model
- How to delete wallpaper
- Model
- How to add downlights on a flat ceiling
- Finished product - Model processing
- How to upload and use custom tiled tiles
- Tutorial for making balcony cabinets
- How to make a glass wall
- Where is the universal light strip
- How to do integrated ceiling
- Where is the wallpaper
- Where is the wainscot
- How to add circular LED strips
- Where is the railing
- Where are the lamps?
- Where is the single sliding door
- Where is the grid model
- Where is the full-length mirror
- How to make the furniture against the wall
- How to hide / show the model
- How to groupand ungroup the model
- How to mirror the model
- Why does a certain model still show up even after being deleted
- AI room intelligent layout
- How to embed a squat toilet in the ground
- How to adjust the model size
- How to modify the beam sticker material
- Construction
- How to add platform
- How to remove toe kick/top molding in a single space
- How to add beam
- How to adjust door/window elevation
- How to use Free modeling
- Corner bay window
- How to draw a balcony
- How to change ceiling light color
- How to draw opening
- How to add ceilings
- How to draw stairs
- How to adjust the direction of door
- How to pull down kitchen/bathroom ceilings
- How to draw curved ceilings
- How to use platform to design stairs
- How to draw a threshold stone
- How to make a sun room
- How to add top molding/toe kick
- Doors & windows not showing
- How to add a central air conditioner on the side of the ceiling trend
- Model design tools
- Texture
- Rendering
- Image rendering
- How to download the rendering
- How to restore the deleted effect picture
- Tutorial of film and television grade rendering
- How to send the panorama to others
- Why can't the panorama be downloaded
- Multi-channel effect picture download
- How to render a more realistic renderings
- How to render a small space
- How to handle the lighting of the aisle position
- How to render the arial view
- Why does an exterior scene appear during rendering
- Why the rendered image has no ceiling
- Why are there many rendering noise points
- Why does the rendering fail
- Why the rendered picture turns black
- How to use supplementary lighting
- How to set advanced lighting
- How to modify the color of the light
- What kind of angle is the best for rendering the renderings
- Rendering settings
- How to deal with the rendering of the ceiling without the light strip effect
- Real-time rendering
- Model self-illumination setting
- New lighting template
- Snapshot interaction optimization
- How to enhance the quality rendering
- Specified irradiation direction setting of supplementary light
- Later parameters - Bloom
- Lighting template adds five brightness levels
- How to adjust the rendering angle
- Custom upload of exterior scenes
- Different supplementary lighting effects
- What is the reason that the downlight model cannot be seen in the rendering image
- Understanding solar light settings
- Snapshot re-shooting function
- Later parameter adjustment
- Understand rendering quality and resolution
- Depth of field rendering
- Q&A
- How to use the camera shear
- How to modify the name of the panoramic image tag
- Why can't the panoramic editor add scenes
- Why will rendering be exposed
- Why is the rendered image very blurry
- Why the rendering remains unchanged after the model modifies the material
- Why is there no ceiling when rendered
- The difference between bird's-eye view and effect drawing
- How to render the renderings
- Why there is no render button
- Why will rendering be queued
- How to modify the exterior view image
- Panoramic Image Rendering Tutorial
- Drawing AI
- Image rendering
- Custom furniture
- Wardrobe/closet system - Unit
- Cabinet body stretching and dimension modification
- How to add back panel
- How to add a door of corner cabinets
- How to make a divider cabinet
- How to use the inner space display
- How to modify cabinet elevation
- How to operate the cabinet corner cutting
- How to make a stair cabinet
- Where is the arc cabinet?
- How to make Tatami
- How to make a drawer
- Where is the push-pull cabinet?
- How to export Cabinet wardrobe CAD
- How to use wall paneling
- How to collect the grouped cabinets
- Special-shaped plate editing
- How to ungroup a group cabinet
- How to use the annotation
- How to add back panel
- How to rotate groups
- Sliding door wardrobe tutorial
- What to design corner desk
- How to copy the cabinet?
- How to install cabinet filler
- How to add cabinet shelf lights
- Where is the hands-free cabinet?
- How to modify the size of the board separately?
- How to use the cabinet bevel cut
- Custom Wood Windows and Doors
- Solid wood door replacement Lock
- How to open the room door
- Solid wood set line how to add foot pier
- Solid wood installation wall light strip
- How to change solid wood door size
- How to copy solid wood windows
- How to hide solid wood doors
- Solid wood module how to remove the door lock
- Solid wood wall panels paving evenly
- Solid wood door replace the casing line style
- How to group solid wood
- Aluminum Windows and Doors
- How to change the material of aluminum doors and windows(V5)
- How to modify the door top window size of aluminum doors and windows (V5)
- How to modify the color of aluminum door and window glass(V5)
- How to export aluminum doors and windows CAD(V5)
- How to hide\collect aluminum doors and windows(V5)
- How to move aluminum doors and windows(V5)
- How to open aluminum doors and windows
- Ruler display - position ruler
- Getting started with rule optimization
- Detail graph export
- Wardrobe/closet system - Functional parts
- How to use the parametric wine rack
- The use of plate uniform distribution function
- How to add cloth rod?
- How to add a mirror?
- How to modify the material of the light board
- How to modify the handle size?
- How to change the size of the drawer?
- Why do drawers jump out of the door wardrobe after adding?
- Plate point editing is optimized at the edge
- The specific location of the horn handle
- Wardrobe/closet system - Door Drawing Guide
- Generate multiple doors added symmetrical opening settings
- Instructions for drawing doors for sliding door wardrobe
- Door show, hide support settings shortcut key
- How to open the cabinet door
- How corner cabinets generate doors
- How to design an aluminum frame glass door
- Generate door scaling settings
- How to edit an arched door hole on a Door
- How to change cabinet door to flip door?
- Door batch extension
- Door opening angle, drawer opening proportional settings
- How to make a slant door
- How to turn a door into a drawer
- Why is the door black?
- Instructions for converting the side panel into a door
- How to change door to inner or outer cover
- Drag and drop function components to the cabinet door panel for automatic hiding
- Wardrobe/closet system - Molding Tutorial
- How to generate a single cabinet kick board
- How to add arc top molding
- How to generate the top molding line
- How to add arc top molding
- How to install the bevel cabinet top and base molding line
- What should I do if the line direction is reversed?
- How to modify toe kick material and size
- How to make an arc cabinet foot line
- How to modify the texture of a line
- Wardrobe/closet system - Parameter Settings
- How to use the cabinet for accurate measurement
- How to open a hole in the plate
- How to edit a board into beveled cuts
- How to move the panel
- How to modify the size of the panel
- How to modify the thickness of the side panel of the cabinet
- Ruler display Add one button to mark the size of the cabinet
- Input parameter value exceeds limit prompt
- Feature ruler settings detailed and concise mode
- How to rotate the cabinet
- How to display cabinet parameters
- Automatic hidden door function for placing function pieces and accessories added switch control
- Wardrobe/closet system - Texture
- How to modify all door core materials
- How to modify the materials of different plates in the same cabinet?
- How to rotate the material
- Why don't highlight doors render reflective effects?
- Why is the material library not displayed?
- Why is the rendered material different from the actual one?
- How to make the color of finished furniture and customized furniture uniform
- How to change the texture size
- Where is glass texture?
- Why can't the material brush be used?
- Replace material packs to add search function
- Wardrobe/closet system - Kitchen countertop
- Wardrobe/closet system - Handles
- Kitchen Cabinets - Handles
- Kitchen cabinets - Moldings
- Kitchen Cabinets - Unit
- Kitchen cabinets - Kitchen countertops
- Kitchen Cabinets - Hardware and Appliances
- Kitchen Cabinets - Structure
- Kitchen cabinets - Doors
- Wardrobe/closet system - Unit
- Construction design
- Free Model - Q&A
- How to use free modeling feature to design doorways
- Free modeling how to import CAD and SKP files
- How to separate free modeling faces
- Free modeling how to make a cylinder
- How to copy move free modeling models
- How to mirror free modeling objects
- Free modeling ceilings
- How to make free modeling lines smoother
- How to design arc wall paneling in free modeling
- Tile floor plan export in free modeling
- What are the steps to draw an inverted circle in free modeling?
- How to open a hole in the original top surface of the apartment type
- How to modify the material of the free modeling model
- How to design a shaped platform?
- How to draw arc in free modeling
- Tiling - How to Lay Tiles
- How to make tile parquet
- How to make ceramic tile corner cut mosaic
- How to design windmill tile
- How to conduct I-shaped tiling
- How to pave herringbone tile
- How to lay bricks with rounded corners
- How to lay bricks with rounded corners
- diamond tile paving
- Tile parquet explanation
- How to do I-shaped tile design
- Tiling - Q&A
- Why do render bricks reflect light?
- Why is the render brick texture unclear?
- Bricks in 3D state after brick paving are not displayed complete
- How to clear tiles quickly
- Do you have a tutorial for customized tiles?
- How to make a double wave line
- How to change tile size
- How to modify the tile grout joint material
- How to modify the tile grout joint size
- How to align the tile grout joint?
- How to rotate tiles?
- Copy tile
- How to group tiles
- When paving tiles how to set starting point?
- Export whole house tile floor plan
- How to pave tile to the exterior wall?
- How to add text and other annotations of the tiling floor plan
- How to pave tile to the exterior wall?
- How to change customized tile size
- Why can not select the brick?
- Why do render tiles reflect light?
- How to pave tiles continuous
- Why does the brick render black?
- Why do bricks flash and have shadows?
- Tiling - High Pressure Waterjet Processing Materials
- Tiling - Tile Area Design
- Practicality
- Construction design tips
- Material Brush for ustomized Models and Finished Product
- Wall material data synchronization
- One-click floor/wall paving
- Recess placement
- How to Tile Areas
- Where is the Decorative?
- Roof Balcony Design
- How to Remove Toe kick(aka skirting line)
- How to Quickly Find Finishing Materials
- How to Settings Library Ceiling Height
- Ceilings and Walls - Area Design
- Why can't the second ceiling layer be displayed in 3D after drawing the second layer ?
- How to generate a light trough
- How to make a chamfer on the wall
- How to get into the ceiling wall that you customed before and how to delete the customed wall/ceiling
- How to custom ceilings
- Ceiling CAD Drawings Export
- How to Add Light Strip to Double Layer Style Ceiling
- How to Draw a Circular Area
- How to import special shaped ceiling
- How to custom ceiling to the middle
- How to Go back to the Custom Mode for the Customed Ceiling or Delete it
- Gypsum Line Ceilings
- Ceiling and walls - Moldings
- How to modify the color of the light strip on the ceiling
- How to modify the position distance of the filler
- Tutorial for Customizing Guideline Lines to Create a Background Wall
- How to mirror the Filler
- Adding Metal Strip for Ceiling
- How to delete the Filler
- How to put the multi fillers
- Why the light strip on the ceiling show black in rendering
- How to add/modify light strips
- Ceiling and Walls - Uneven Design
- Array multi-panel&line in ceiling custom
- How to draw the staircase opening on the second floor
- How to Generate Unilateral Light Strip
- How to Draw Irregular Ceilings
- How to add light strips without plaster lines?
- How to Create Irregular Wall Shapes
- Tutorial for Making Ceilings to drop down
- How to set joint type for Integrated Wall Panel
- Tutorial for building a recessed ceiling in a 'return' shape”
- How to design a curved LED strip on the wall
- How to dig a hole in a wall
- How to make a sloping top
- How To Build Swimming Pool
- Tutorial for Grille Background Wall
- Ceilings and Walls - Q&A
- How to install downlights
- How to Delete Ceilings
- How to Convert the straight edge to arc edge in ceiling custom
- How to install the Dado
- Customized Ceiling How to modify the distance from the top
- How to install aluminum beam
- Tutorial for Arched Doorway in Background Wall
- How to Make Double-Layer Ceilings
- Why Ceilings Can't Be Filled
- How to deal with Black Shadow in Ceiling
- How to hide or modify the top molding and skirting line(aka toe kick)
- How to design lighting line on the wall
- Ceiling and Wall - Ceiling Panels
- How to increase the size of the gusset
- Why can't I see it after putting on Spotlight?
- How to change the material of the gusset?
- How to move the gusset
- How to rotate the gusset
- The difference between spaced paving and continuous paving
- How to arrange the gussets equally spaced
- Gusset rendering goes black
- Free Model - Q&A
- Set up account
- How to quote and export drawings
- Quote
- Blueprint
- How to export cabinet CAD drawings
- How to import CAD into the board for special-shaped modeling
- Where are the download drawings?
- How to Settings CAD Drawing Logo in Software
- How to export the model space drawing
- Ceiling drawing export
- One-click export of Tile flat drawings
- How to export CAD Construction drawings
- How to delete imported drawings
- How to download floor plan layout
How do designers upload models
Uploading Models and Textures in the Personal Section
- UPLOADING MODELS
For finished models, platform users can upload and use them independently. For custom models, such as doors, cabinets, etc., the object must be provided to the online customer service representative for registration and update. Details are as follows:
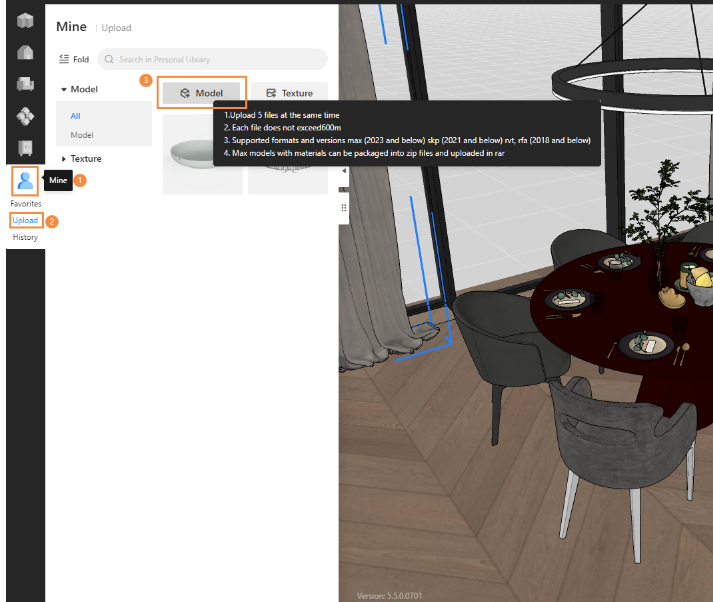
- You can upload up to five models at a time;
- Each file must not exceed 200MB;
- Supported file formats: max, skp, rvt, rfa;
- Model software version requirements: For skp files, the version must be 2015 or earlier, and for other formats, all versions must be 2020 or earlier;
- 3ds Max models with materials can be uploaded as a zip or rar compressed file.
Upload procedure:
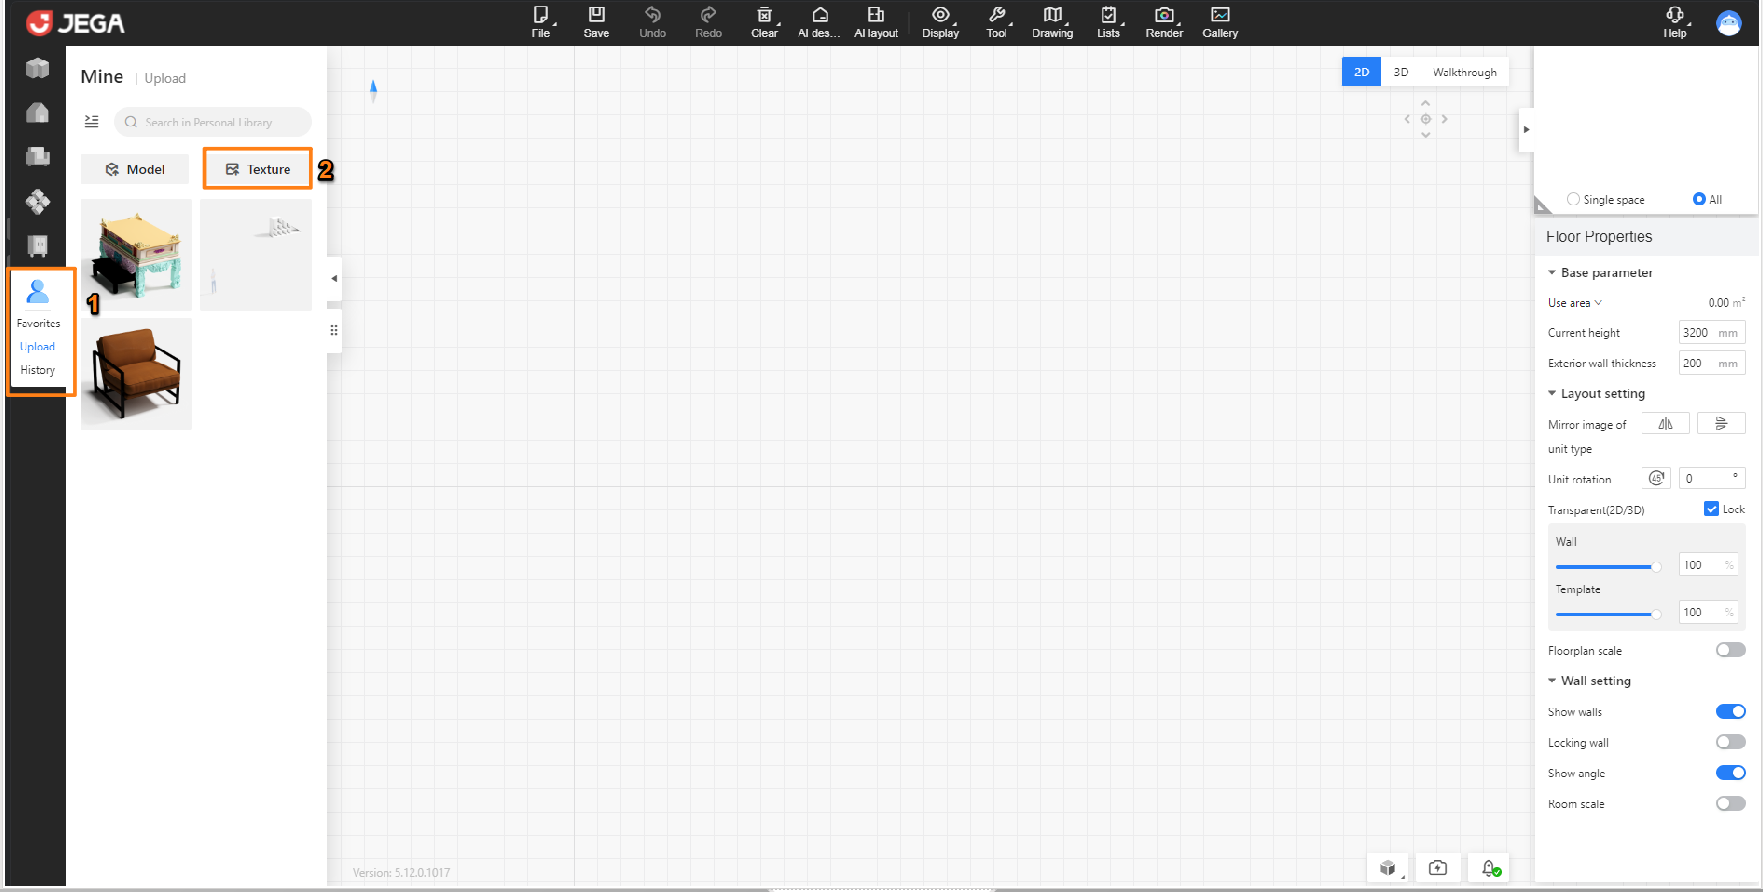
- Click on "Upload" in the "Mine" section, select "Model", and click on the upload button under "Model".
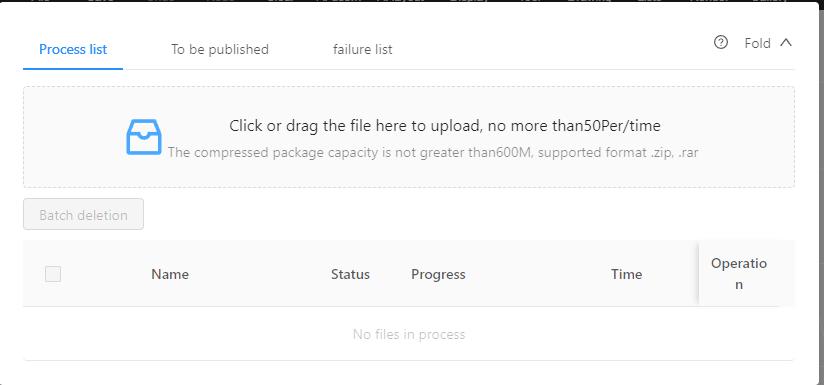
2. Drag and drop the model file into the process list, which includes:
-
- For 3ds Max files: Upload the .max file, along with the diffuse and bump textures.
- For SketchUp files: Upload the .skp file.
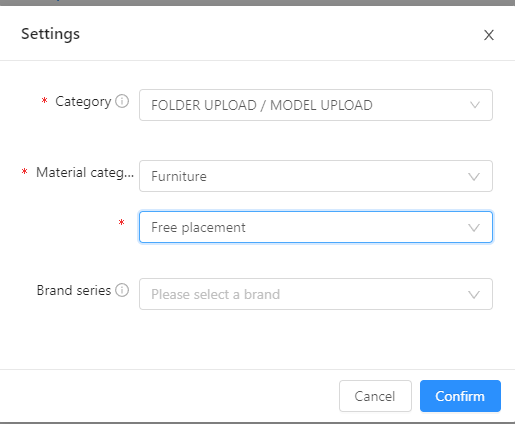
3. Switch to the to be published section, select the object ready for upload, click Batch setup, enter the parameters in the settings panel, and confirm the release.
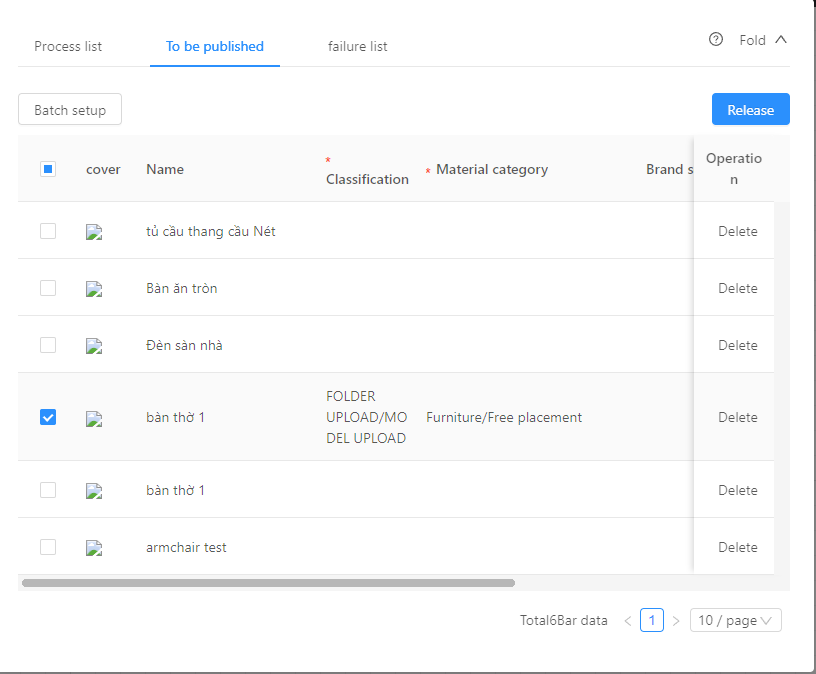
4. The uploaded models will be displayed in the upload section.
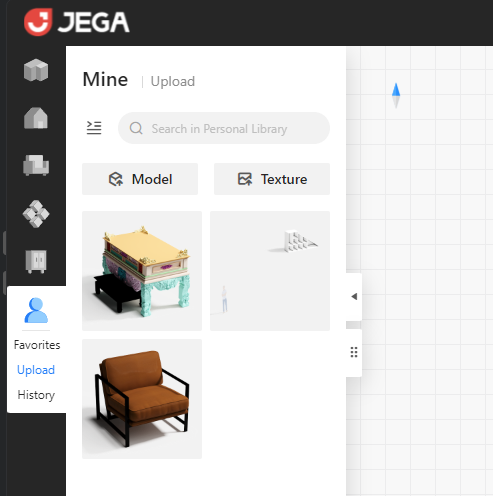
II. UPLOADING TEXTURES
For textures, platform users can upload and use them independently. The steps are as follows:
- First, you need to have the correct texture map with its actual dimensions. For example, let's use the texture MS-LK5909-WN.
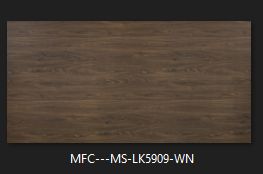
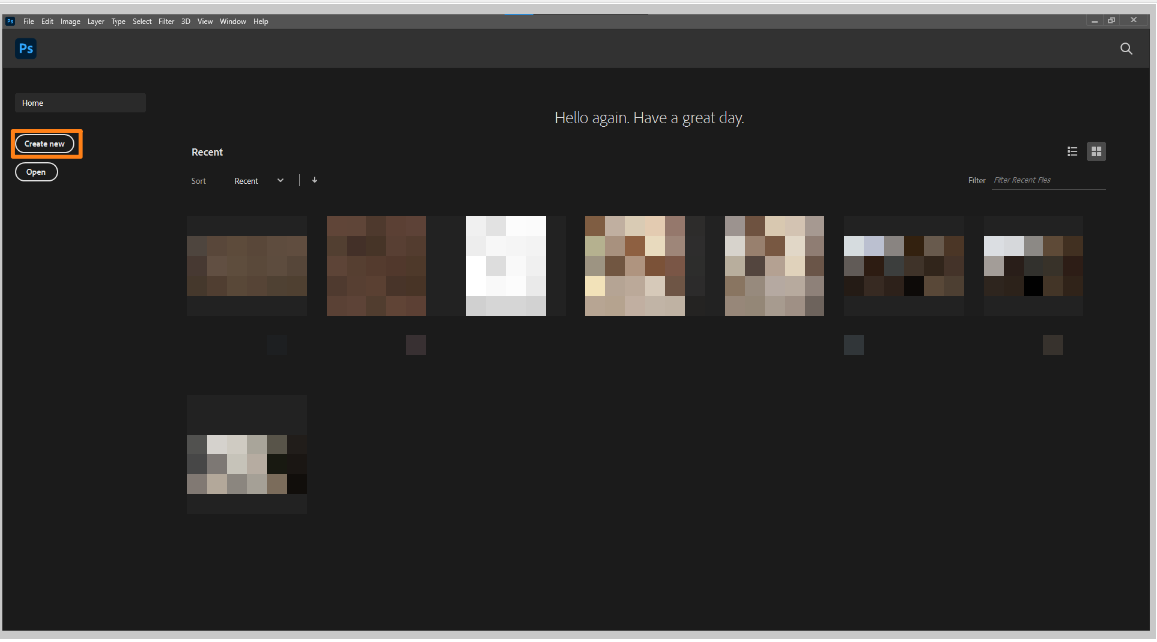
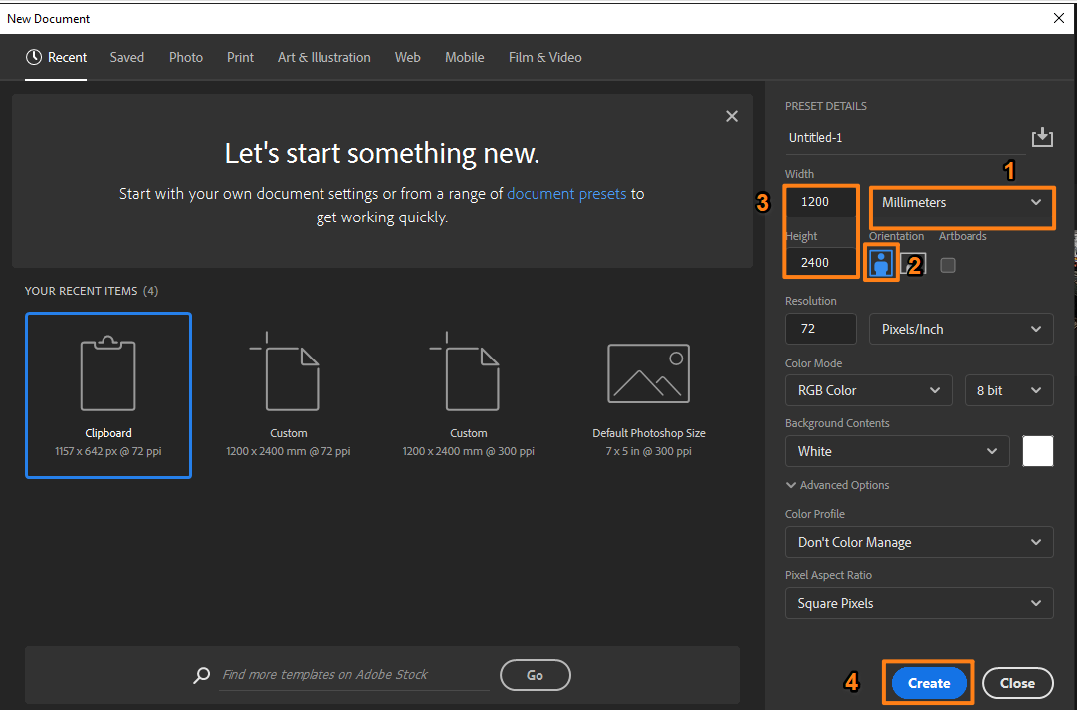
2. Next, open Photoshop, create a new image, adjust the unit to millimeters, and set the size to match the actual wood panel dimensions (e.g., width 1200mm, height 2400mm, or another size depending on the actual material size). Then click Create.
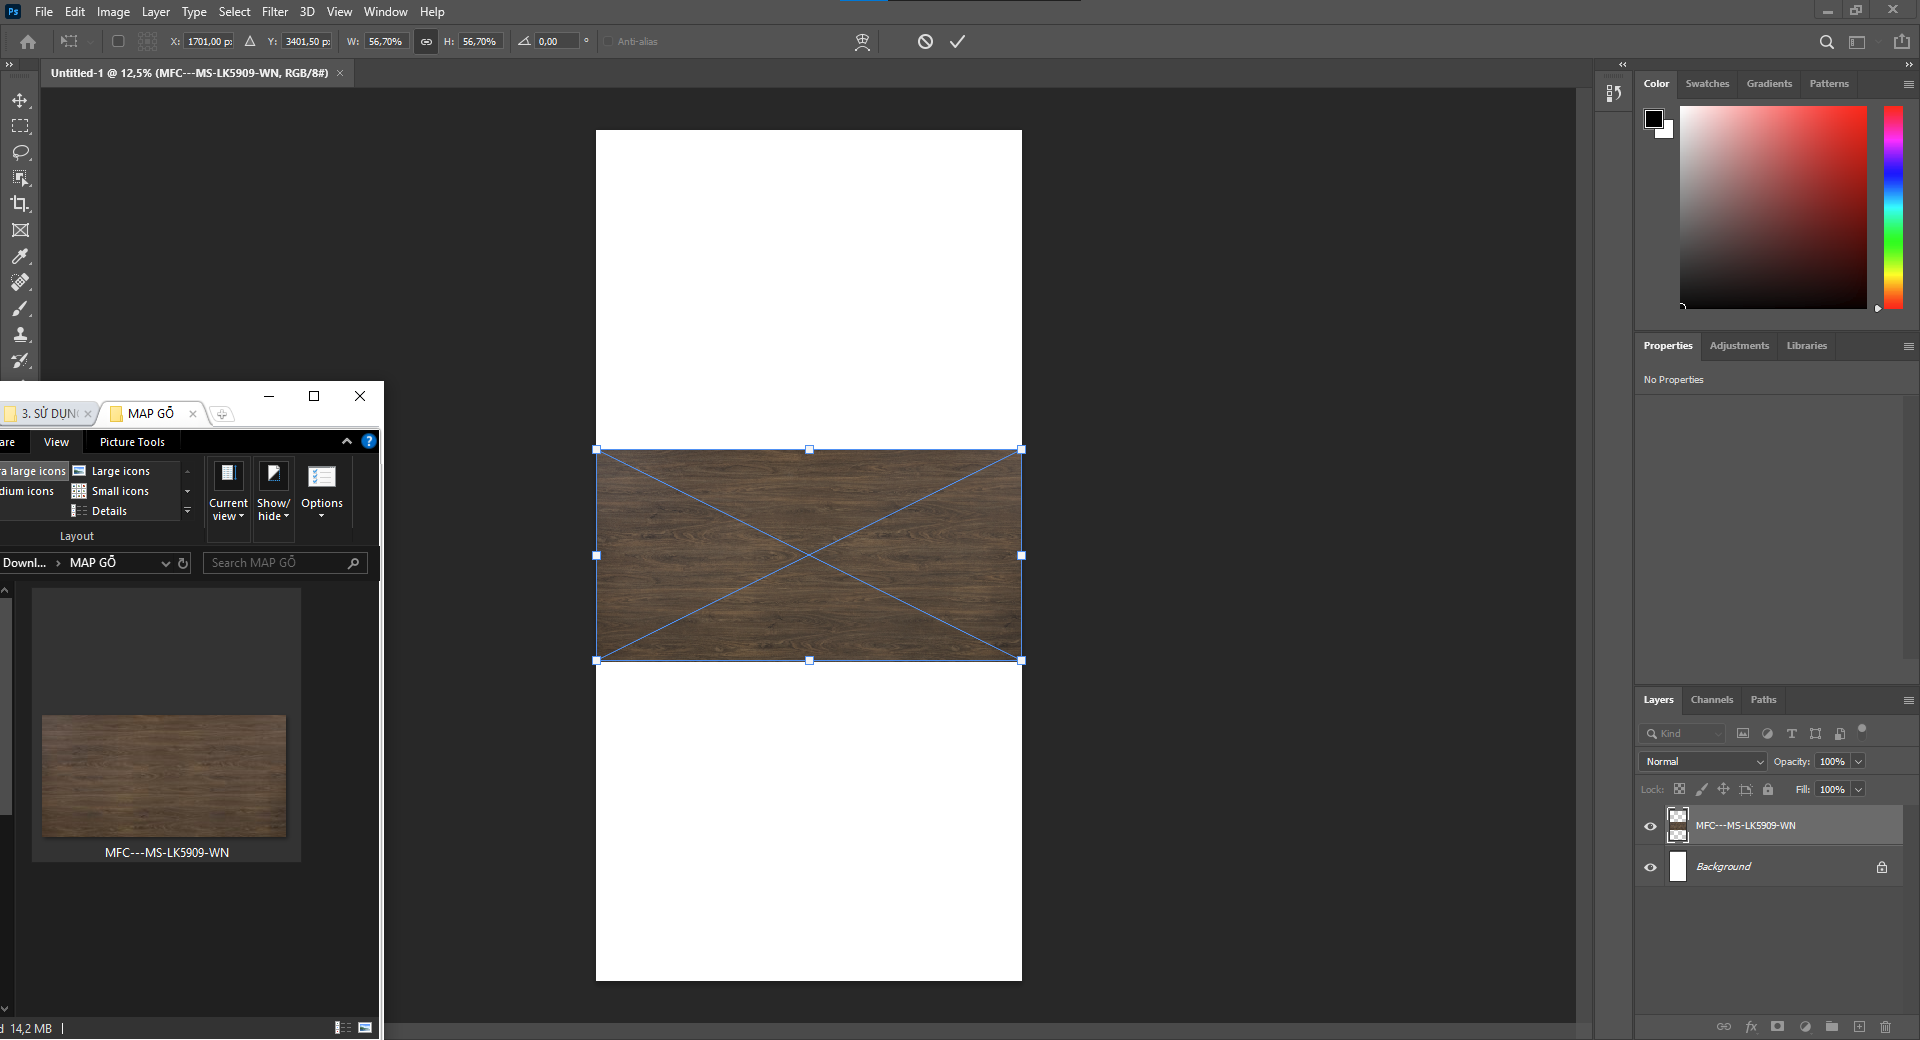
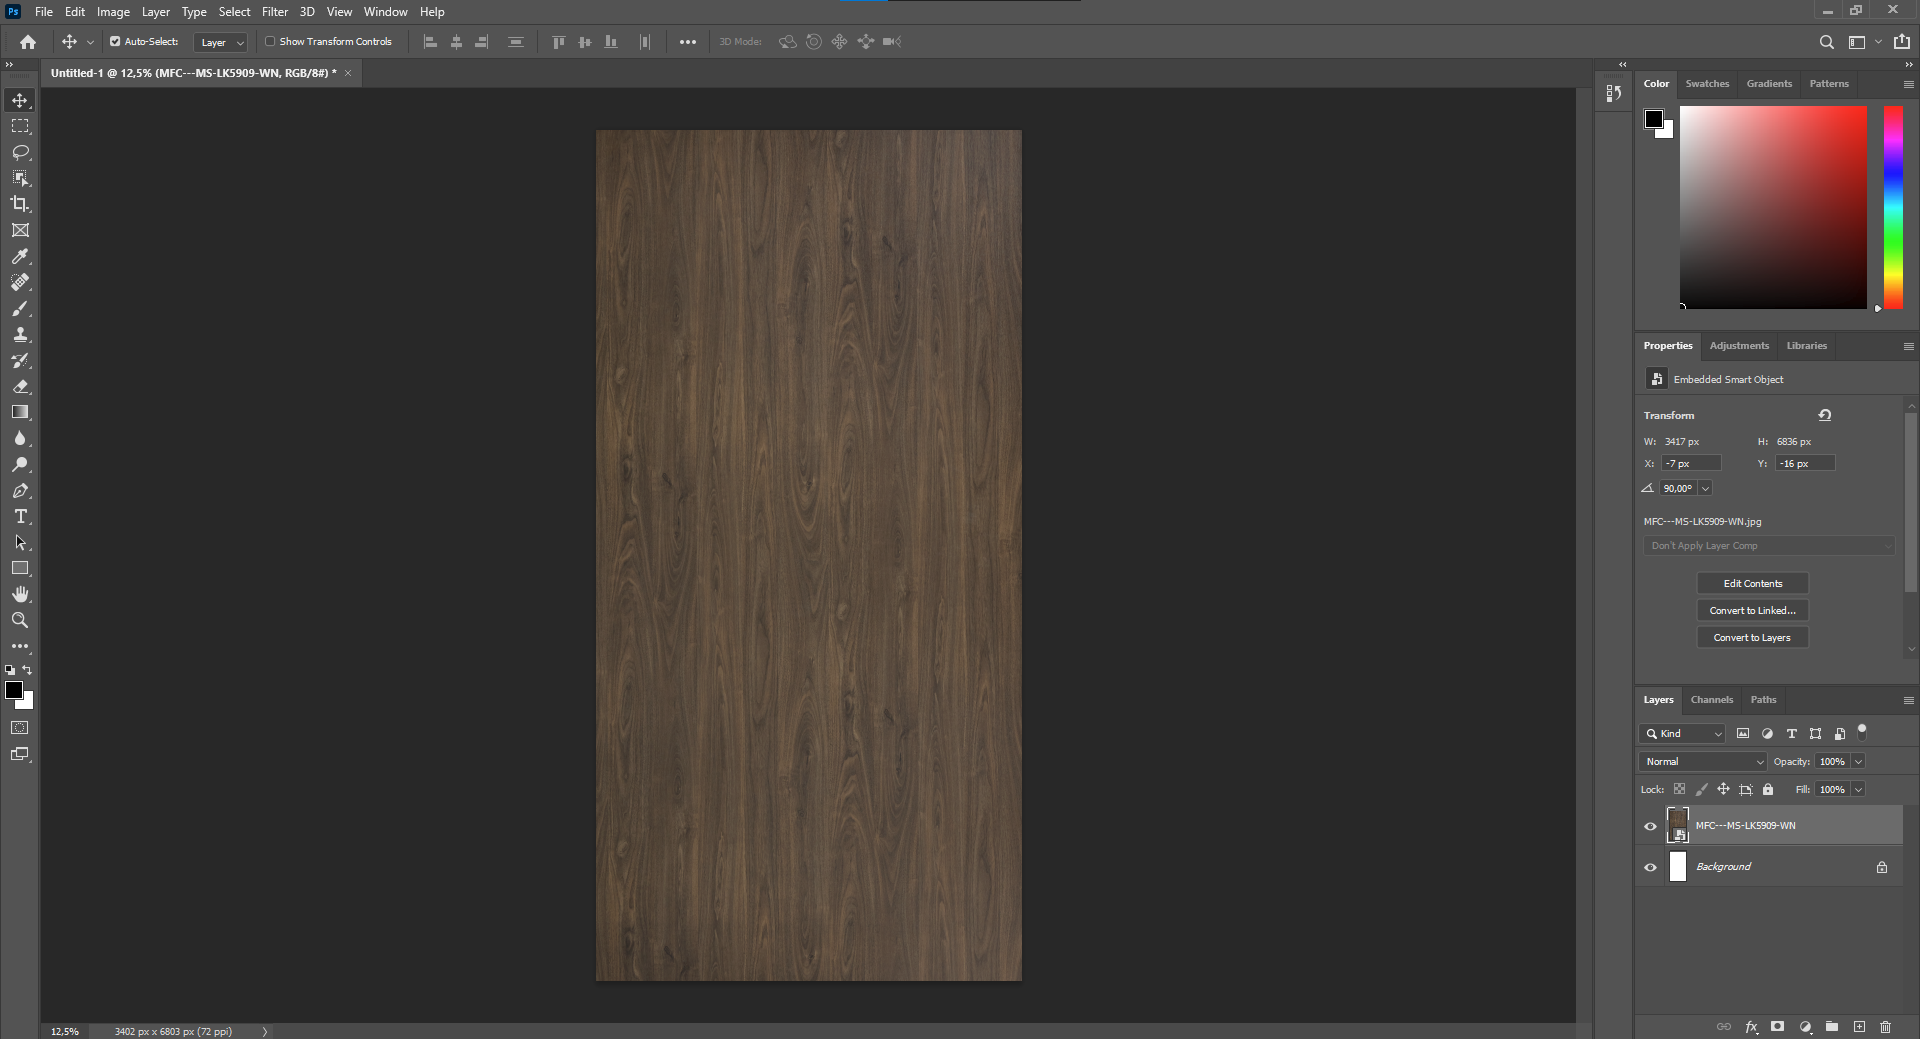
3. Drag the chosen wood map into the newly created workspace, rotate and scale the map to fit the working area. Confirm by pressing Enter.
4. Save the created texture by using the shortcut Ctrl + Shift + Alt + S, change the default format (GIF) to the more common JPEG format. Click Save.
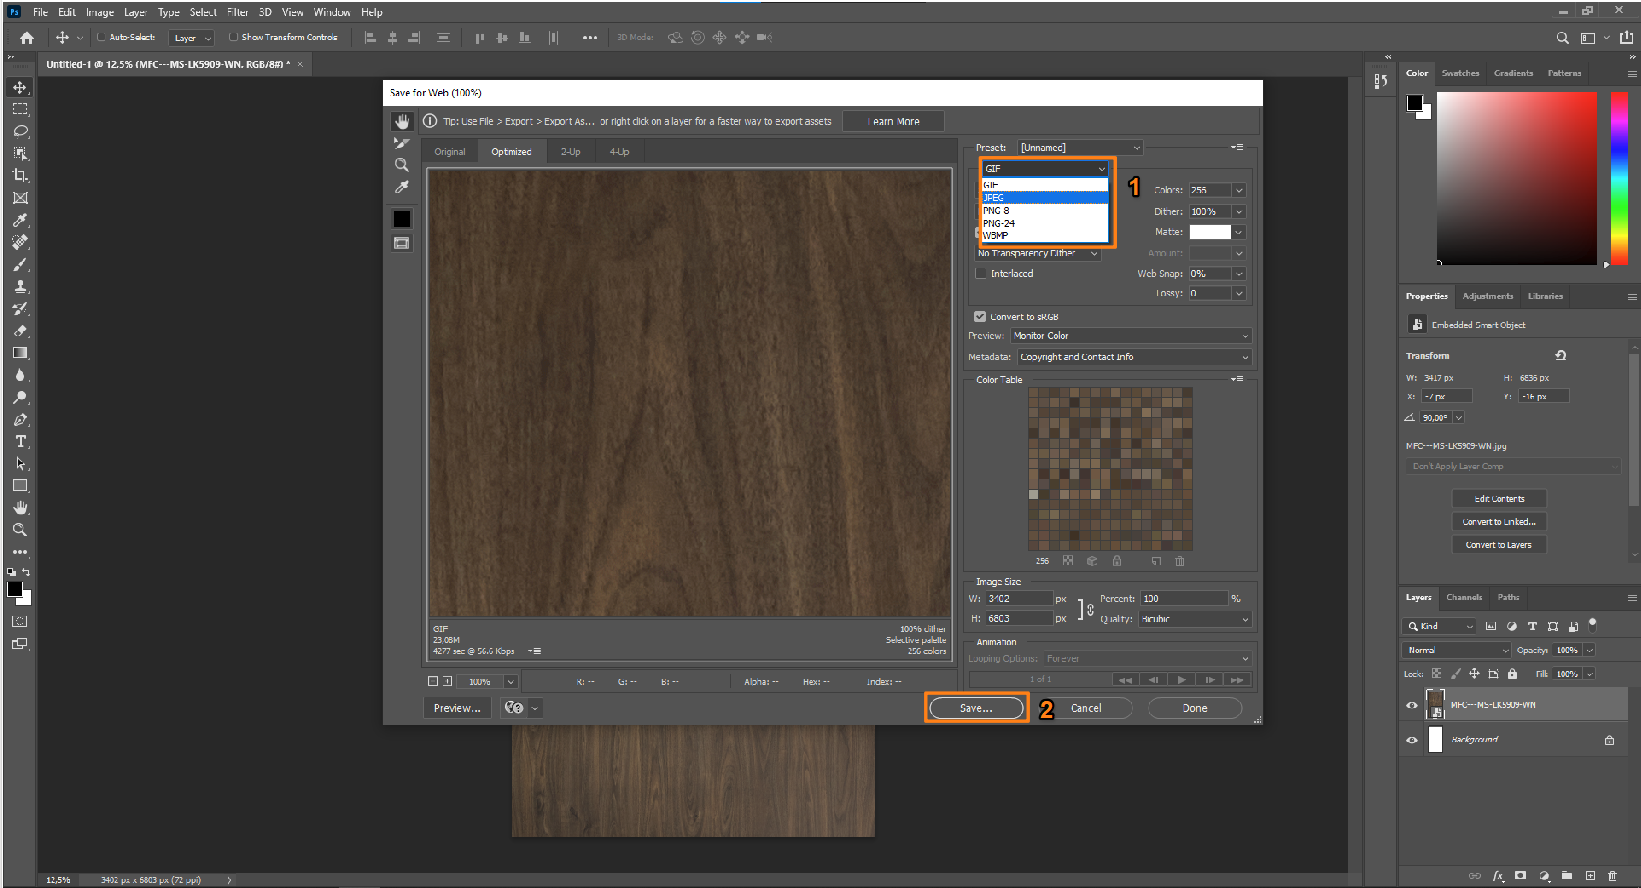
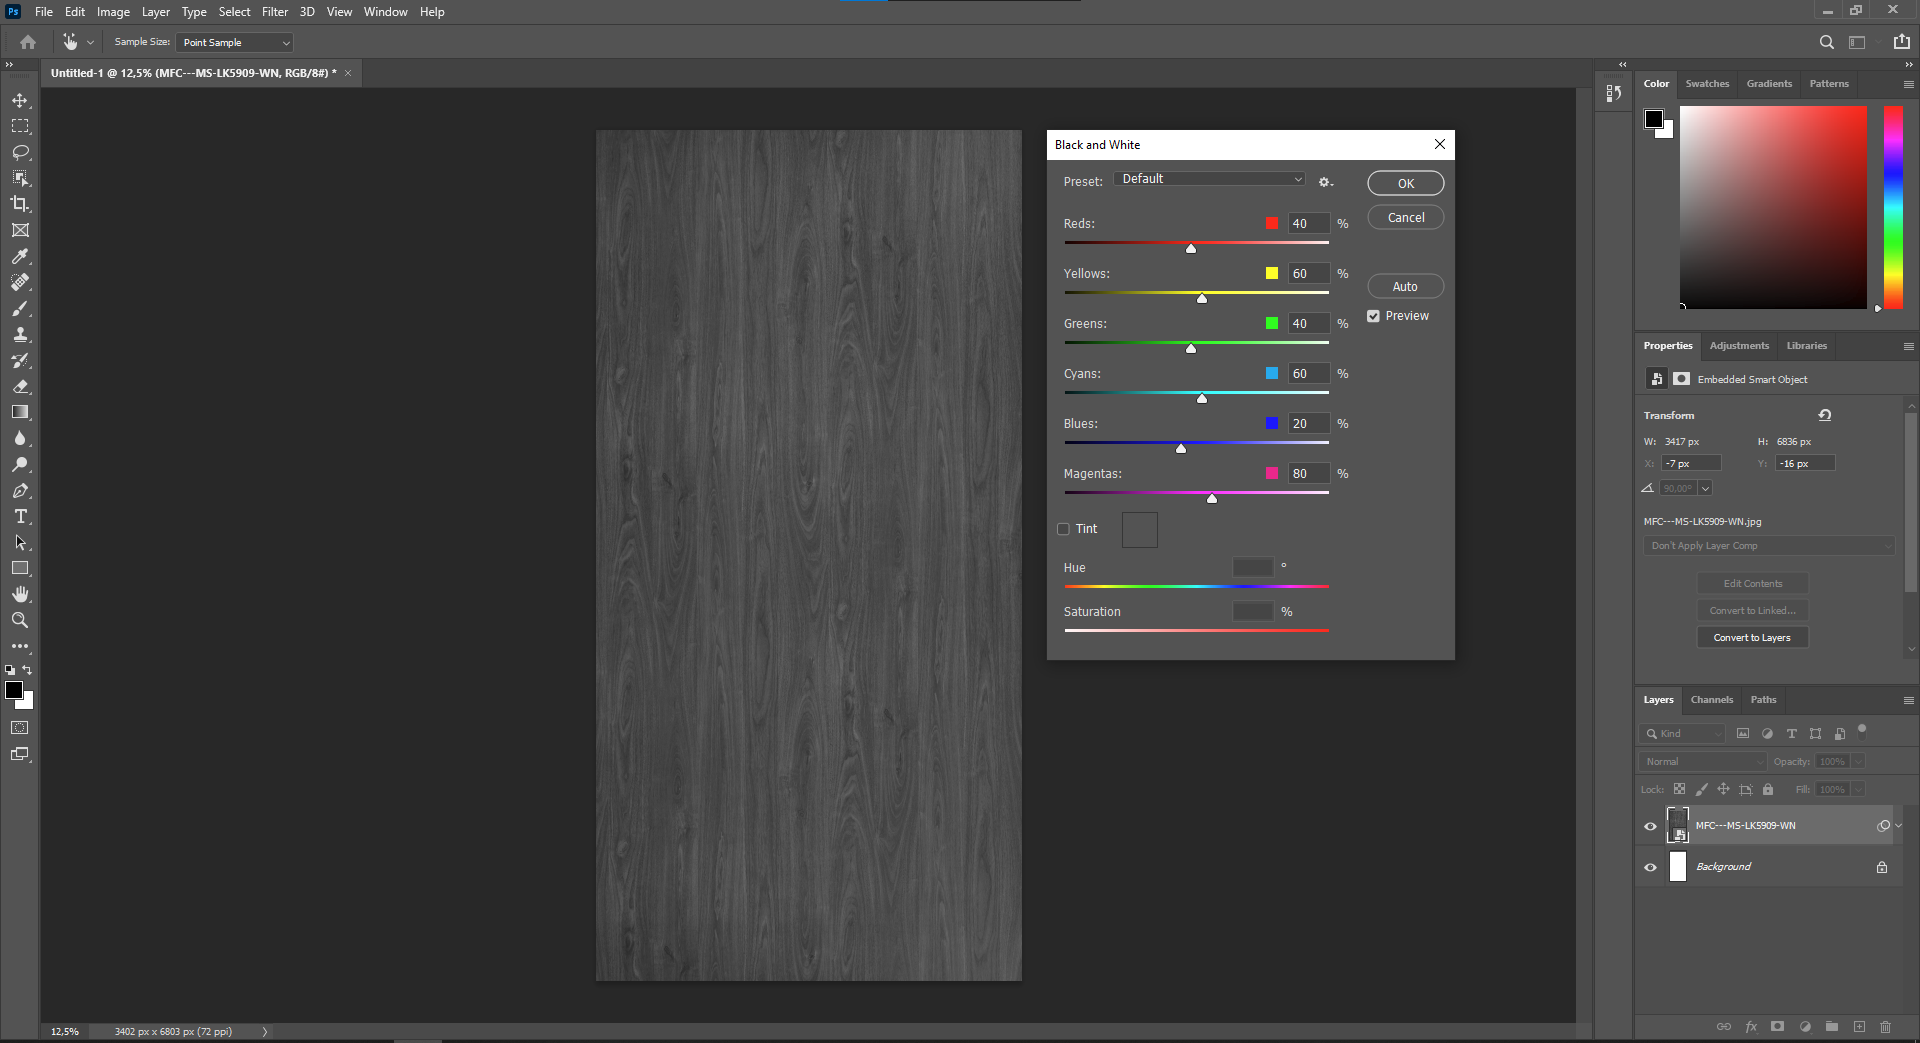
5. Next, create a Bump map for the wood texture. Use the shortcut Ctrl + Shift + Alt + B. Press Enter.
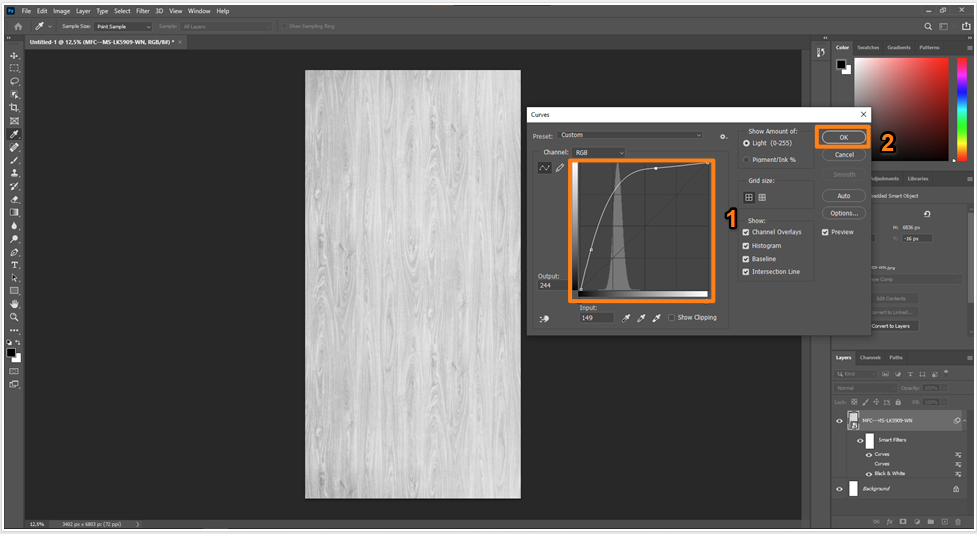
6. Press Ctrl + M, create a Curves overlay layer, and adjust the brightness of the Bump map.
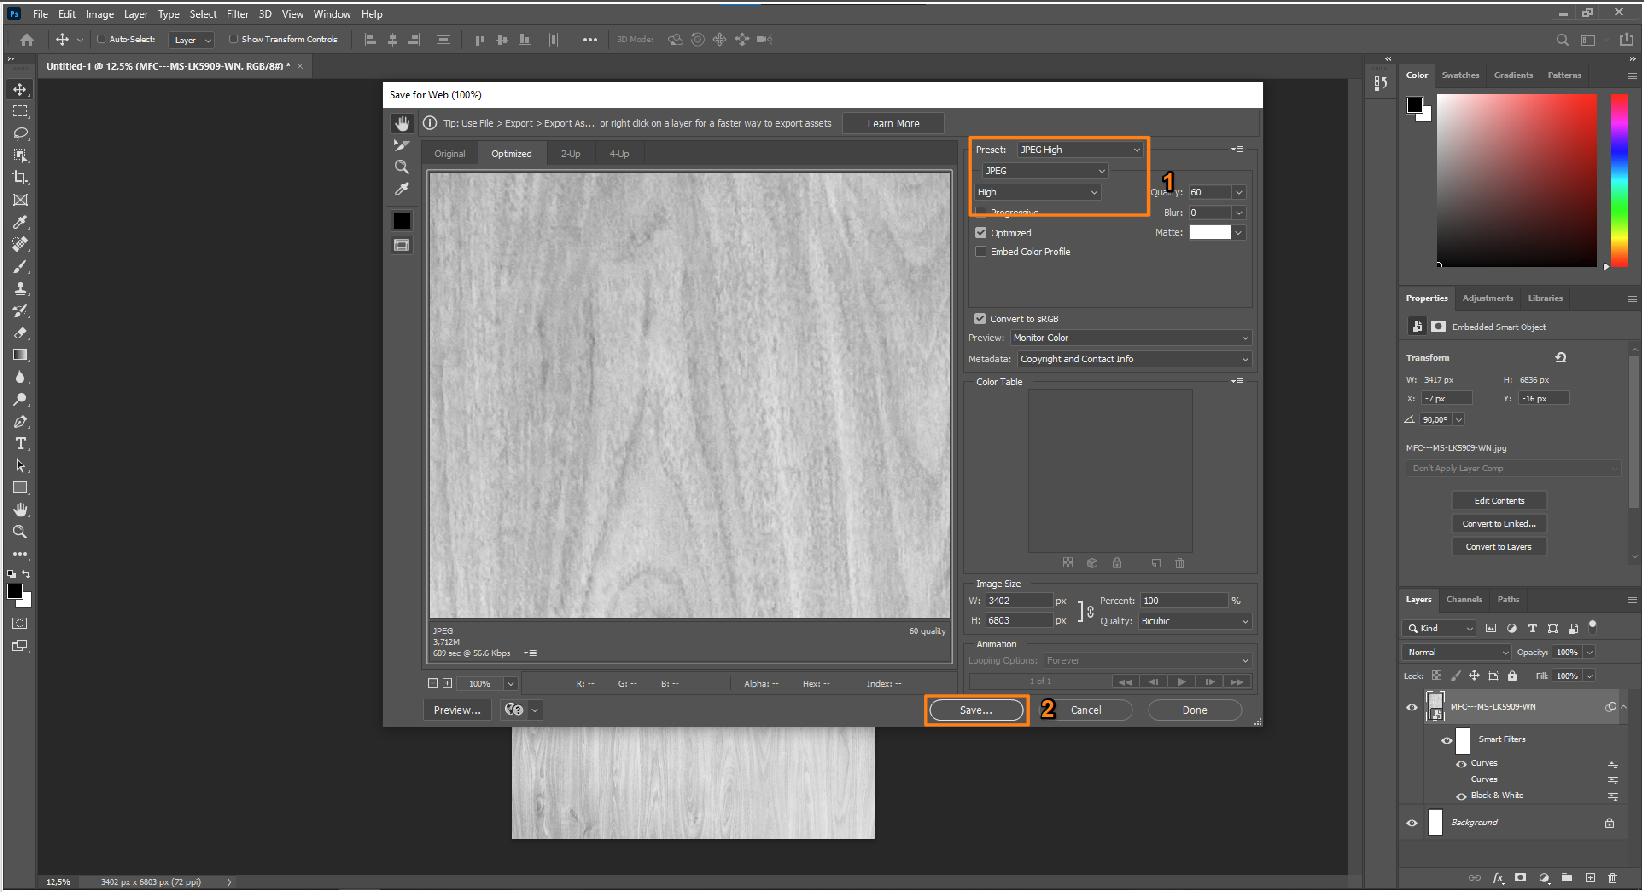
7. Return to step 4, save the created texture again using Ctrl + Shift + Alt + S, and once again save it in JPEG format.
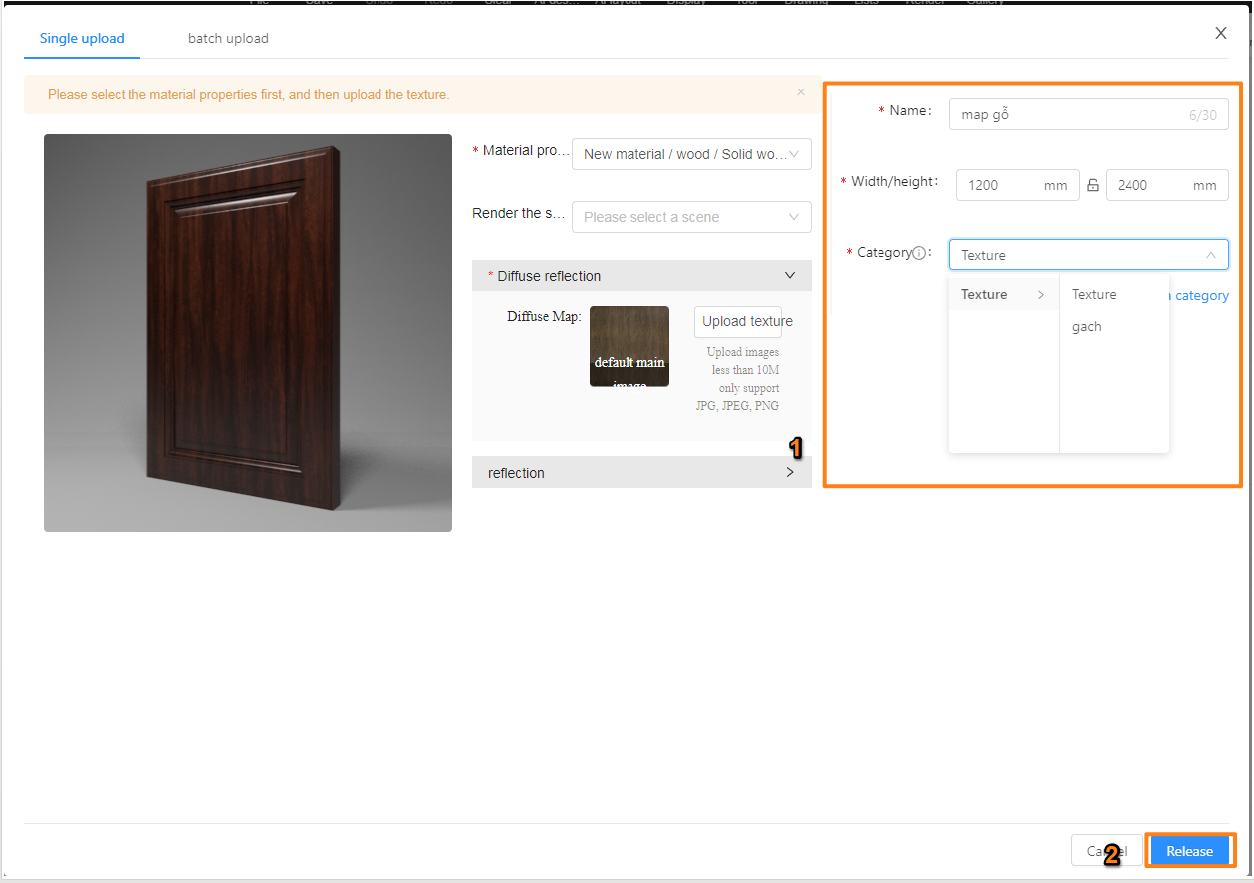
8. Go to Mine → Upload → Texture, select the texture. In the Material properties section, choose the appropriate category for the uploaded texture.
-
- For wood: Select New material → Wood → Solid wood → 0.5 All dumb solid wood, 0.7 Matte solid wood, 0.8 Soft light solid wood, 0.9 High-gloss solid wood. The final four categories will directly affect the reflectivity (gloss) of the wood.
- For tiles and stone: Select New material → Tile → Concave-convex brick → Concave convex particle floor tile for matte tiles; select New material → Tile → Polishing brick → Polishing brick for glossy tiles.
There are many other categories available to match various materials such as metal, paint, glass, wallpaper, plastic, fabric, leather, stone, flooring, special materials, etc.
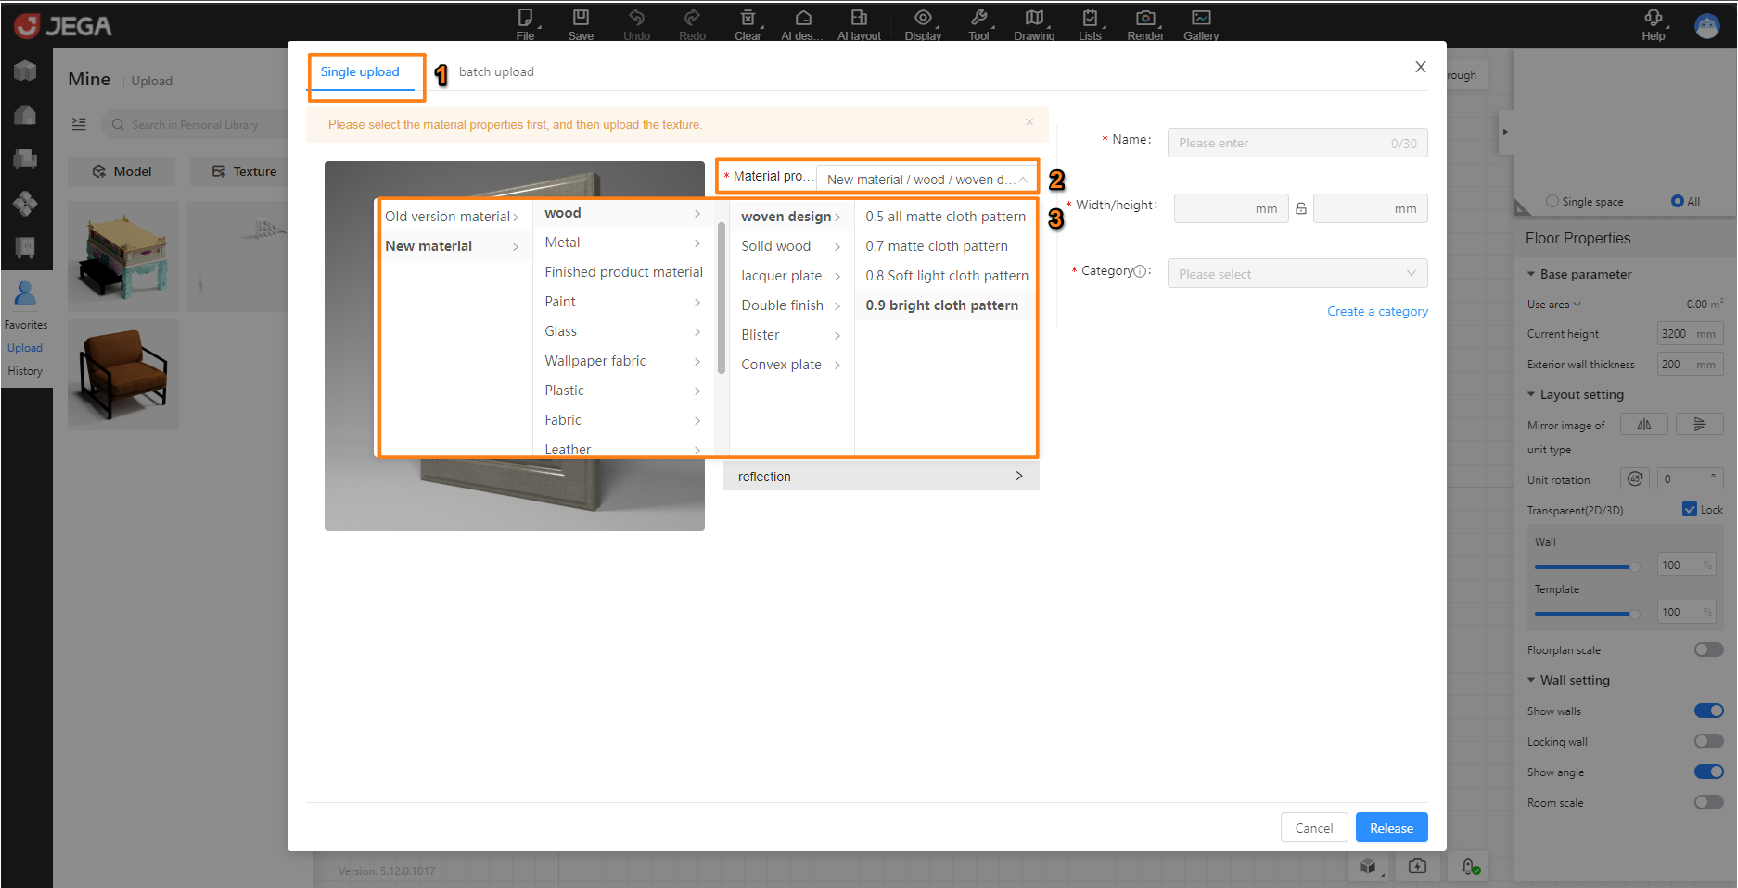
9. Name the texture, set the actual dimensions, and choose the folder to save it in. Click Release.
