- Instructions for new users
- Software introduction
- Beginner guidance
- How to save SKP file as old version
- How to replace textures in SketchUp?
- How can I set the graphic card of higher performance to run JEGA Cloud Design?
- Account information setting
- Why is the font size too small/large in Jega Cloud Design?
- How to change the project name?
- How to upload a floor plan?
- Why are the previous projects missing?
- How do I switch back to the old version?
- How to draw a wavy line?
- Why is the ceiling not showing after placement?
- The layout display optimization of the canvas
- How do I hide the floor plan?
- How to cut a hole in the wall?
- Where can I find models and textures?
- Where can I find study materials?
- How to add doorways?
- How to perform software settings?
- How to view the shortcut keys?
- Why can't I rotate with the right-click?
- Why does it lag during operation?
- Computer configuration requirements for software use
- How to use tempanels?
- How to clear the browser cache?
- Freehand wall drawing
- How to modify the material of a finished model?
- How to cut a hole in the wall?
- Which browser should be used for using Sunvega?
- Which browser should be used for using Sunvega?
- Why are the shortcut keys not working?
- Start using
- Use basic software
- Combination model supports replacement function
- Material library - The material library pop-up box in customization is adaptive to the screen size
- How do designers upload models
- Instructions for creating folder categories for uploading
- Space type adds "Master Bathroom"
- Quick search / filter model
- Left navigation collapse/expand shortcut keys
- Add the shortcut key function for rotating the object by 45°
- Finished product locking and unlocking
- How to view the current version
- Mouse operation habit optimization
- Object toolbar optimization
- Design common shortcut keys
- How to set the transparency of the wall
- Optimize drag and object snap forces in 2D and 3D
- How to resize ornaments
- New history record
- How to make custom cabinets not be limited by craftsmanship
- "About" panel adds key information
- Collection logic optimization: Materials not authorized by the creator cannot be collected
- Style rendering optimization
- Camera settings
- Optimize the top menu
- How to delete unnecessary carcass panel
- How to quickly switch scenes
- My collection directory page, add custom directory sorting
- Finished product combination mirror image function
- How to save the project
- How to change the moving speed
- How to measure the distance on the floor plan
- Top menu adds a shortcut entry for the custom module
- Application effect to increase color temperature and brightness of the same product
- Set and hide the space name
- How to adjust the perspective
- Basic module supports placing ornaments in the cabinet
- Why doesn't the wall drawing adhere
- Object controls (movement, rotation, scaling)
- How to save the floor plan
- Custom shortcut keys
- Search Images by Image - Effect Optimization
- Q&A
- How to save local files
- Why is the operation stuck?
- How to make holes in the original ground
- Why is there no change even after adjusting the floor height
- Why was forced to log out
- What is the shortcut key for copy and paste
- How to add windows to circular arc walls
- Why does a prompt for a long time of no operation on the software pop up
- The splitting and merging of walls
- Why there is no ceiling
- https://www.aihouse.com/global/help-center/3d-home-design/1853
- Why does it prompt that it cannot be saved when clicking Save
- How to mirror the house type
- How to clear the browser cache
- Website User Guide
- Software introduction
- Premises
- Paint the wall
- How to draw an angled wall?
- How to create a circular hole?
- Hidden exterior wall setting
- How to display wall dimensions?
- How to edit wall shapes?
- How to make 3D fonts on the wall surface
- How to determine the position of a beam or a column?
- How to modify the height of a single space independently
- How to lock the wall
- Outer bulge drawing of the wall
- How to display the included angle of the wall
- How to select a single space for drawing
- How to modify the size of doors and windows
- How to quickly modify the materials of the wall or the floor
- Why doesn't the ground show
- How to solve the prompt of too large file when importing cad
- How to draw an arc-shaped wall
- How to draw a low wall
- How to modify the height of the wall
- How to draw the wall
- How to delete the wall
- How to modify the wrongly drawn wall
- How to adjust the length of the wall
- How to drag and draw rectangles to draw rooms
- How to upload CAD floor plan
- How to upload the floor plan image
- How to adjust the thickness of the wall
- Why is the wall transparent
- How to draw a mezzanine
- Doors and windows
- Design space
- Camera angle design
- Paint the wall
- Design materials
- Texture
- How to add/change the ground material
- Where is the wood grain texture map
- How to delete the divider line
- How to divide the area
- How to draw the skirting line
- Where is the metal texture mapping
- Where is the leather texture mapping
- How to replace the material color of the finished model
- How to delete wallpaper
- Model
- How to add downlights on a flat ceiling
- Finished product - Model processing
- How to upload and use custom tiled tiles
- Tutorial for making balcony cabinets
- How to make a glass wall
- Where is the universal light strip
- How to do integrated ceiling
- Where is the wallpaper
- Where is the wainscot
- How to add circular LED strips
- Where is the railing
- Where are the lamps?
- Where is the single sliding door
- Where is the grid model
- Where is the full-length mirror
- How to make the furniture against the wall
- How to hide / show the model
- How to groupand ungroup the model
- How to mirror the model
- Why does a certain model still show up even after being deleted
- AI room intelligent layout
- How to embed a squat toilet in the ground
- How to adjust the model size
- How to modify the beam sticker material
- Construction
- How to add platform
- How to remove toe kick/top molding in a single space
- How to add beam
- How to adjust door/window elevation
- How to use Free modeling
- Corner bay window
- How to draw a balcony
- How to change ceiling light color
- How to draw opening
- How to add ceilings
- How to draw stairs
- How to adjust the direction of door
- How to pull down kitchen/bathroom ceilings
- How to draw curved ceilings
- How to use platform to design stairs
- How to draw a threshold stone
- How to make a sun room
- How to add top molding/toe kick
- Doors & windows not showing
- How to add a central air conditioner on the side of the ceiling trend
- Model design tools
- Texture
- Rendering
- Image rendering
- How to download the rendering
- How to restore the deleted effect picture
- Tutorial of film and television grade rendering
- How to send the panorama to others
- Why can't the panorama be downloaded
- Multi-channel effect picture download
- How to render a more realistic renderings
- How to render a small space
- How to handle the lighting of the aisle position
- How to render the arial view
- Why does an exterior scene appear during rendering
- Why the rendered image has no ceiling
- Why are there many rendering noise points
- Why does the rendering fail
- Why the rendered picture turns black
- How to use supplementary lighting
- How to set advanced lighting
- How to modify the color of the light
- What kind of angle is the best for rendering the renderings
- Rendering settings
- How to deal with the rendering of the ceiling without the light strip effect
- Real-time rendering
- Model self-illumination setting
- New lighting template
- Snapshot interaction optimization
- How to enhance the quality rendering
- Specified irradiation direction setting of supplementary light
- Later parameters - Bloom
- Lighting template adds five brightness levels
- How to adjust the rendering angle
- Custom upload of exterior scenes
- Different supplementary lighting effects
- What is the reason that the downlight model cannot be seen in the rendering image
- Understanding solar light settings
- Snapshot re-shooting function
- Later parameter adjustment
- Understand rendering quality and resolution
- Depth of field rendering
- Q&A
- How to use the camera shear
- How to modify the name of the panoramic image tag
- Why can't the panoramic editor add scenes
- Why will rendering be exposed
- Why is the rendered image very blurry
- Why the rendering remains unchanged after the model modifies the material
- Why is there no ceiling when rendered
- The difference between bird's-eye view and effect drawing
- How to render the renderings
- Why there is no render button
- Why will rendering be queued
- How to modify the exterior view image
- Panoramic Image Rendering Tutorial
- Drawing AI
- Image rendering
- Custom furniture
- Wardrobe/closet system - Unit
- Cabinet body stretching and dimension modification
- How to add back panel
- How to add a door of corner cabinets
- How to make a divider cabinet
- How to use the inner space display
- How to modify cabinet elevation
- How to operate the cabinet corner cutting
- How to make a stair cabinet
- Where is the arc cabinet?
- How to make Tatami
- How to make a drawer
- Where is the push-pull cabinet?
- How to export Cabinet wardrobe CAD
- How to use wall paneling
- How to collect the grouped cabinets
- Special-shaped plate editing
- How to ungroup a group cabinet
- How to use the annotation
- How to add back panel
- How to rotate groups
- Sliding door wardrobe tutorial
- What to design corner desk
- How to copy the cabinet?
- How to install cabinet filler
- How to add cabinet shelf lights
- Where is the hands-free cabinet?
- How to modify the size of the board separately?
- How to use the cabinet bevel cut
- Custom Wood Windows and Doors
- Solid wood door replacement Lock
- How to open the room door
- Solid wood set line how to add foot pier
- Solid wood installation wall light strip
- How to change solid wood door size
- How to copy solid wood windows
- How to hide solid wood doors
- Solid wood module how to remove the door lock
- Solid wood wall panels paving evenly
- Solid wood door replace the casing line style
- How to group solid wood
- Aluminum Windows and Doors
- How to change the material of aluminum doors and windows(V5)
- How to modify the door top window size of aluminum doors and windows (V5)
- How to modify the color of aluminum door and window glass(V5)
- How to export aluminum doors and windows CAD(V5)
- How to hide\collect aluminum doors and windows(V5)
- How to move aluminum doors and windows(V5)
- How to open aluminum doors and windows
- Ruler display - position ruler
- Getting started with rule optimization
- Detail graph export
- Wardrobe/closet system - Functional parts
- How to use the parametric wine rack
- The use of plate uniform distribution function
- How to add cloth rod?
- How to add a mirror?
- How to modify the material of the light board
- How to modify the handle size?
- How to change the size of the drawer?
- Why do drawers jump out of the door wardrobe after adding?
- Plate point editing is optimized at the edge
- The specific location of the horn handle
- Wardrobe/closet system - Door Drawing Guide
- Generate multiple doors added symmetrical opening settings
- Instructions for drawing doors for sliding door wardrobe
- Door show, hide support settings shortcut key
- How to open the cabinet door
- How corner cabinets generate doors
- How to design an aluminum frame glass door
- Generate door scaling settings
- How to edit an arched door hole on a Door
- How to change cabinet door to flip door?
- Door batch extension
- Door opening angle, drawer opening proportional settings
- How to make a slant door
- How to turn a door into a drawer
- Why is the door black?
- Instructions for converting the side panel into a door
- How to change door to inner or outer cover
- Drag and drop function components to the cabinet door panel for automatic hiding
- Wardrobe/closet system - Molding Tutorial
- How to generate a single cabinet kick board
- How to add arc top molding
- How to generate the top molding line
- How to add arc top molding
- How to install the bevel cabinet top and base molding line
- What should I do if the line direction is reversed?
- How to modify toe kick material and size
- How to make an arc cabinet foot line
- How to modify the texture of a line
- Wardrobe/closet system - Parameter Settings
- How to use the cabinet for accurate measurement
- How to open a hole in the plate
- How to edit a board into beveled cuts
- How to move the panel
- How to modify the size of the panel
- How to modify the thickness of the side panel of the cabinet
- Ruler display Add one button to mark the size of the cabinet
- Input parameter value exceeds limit prompt
- Feature ruler settings detailed and concise mode
- How to rotate the cabinet
- How to display cabinet parameters
- Automatic hidden door function for placing function pieces and accessories added switch control
- Wardrobe/closet system - Texture
- How to modify all door core materials
- How to modify the materials of different plates in the same cabinet?
- How to rotate the material
- Why don't highlight doors render reflective effects?
- Why is the material library not displayed?
- Why is the rendered material different from the actual one?
- How to make the color of finished furniture and customized furniture uniform
- How to change the texture size
- Where is glass texture?
- Why can't the material brush be used?
- Replace material packs to add search function
- Wardrobe/closet system - Kitchen countertop
- Wardrobe/closet system - Handles
- Kitchen Cabinets - Handles
- Kitchen cabinets - Moldings
- Kitchen Cabinets - Unit
- Kitchen cabinets - Kitchen countertops
- Kitchen Cabinets - Hardware and Appliances
- Kitchen Cabinets - Structure
- Kitchen cabinets - Doors
- Wardrobe/closet system - Unit
- Construction design
- Free Model - Q&A
- How to use free modeling feature to design doorways
- Free modeling how to import CAD and SKP files
- How to separate free modeling faces
- Free modeling how to make a cylinder
- How to copy move free modeling models
- How to mirror free modeling objects
- Free modeling ceilings
- How to make free modeling lines smoother
- How to design arc wall paneling in free modeling
- Tile floor plan export in free modeling
- What are the steps to draw an inverted circle in free modeling?
- How to open a hole in the original top surface of the apartment type
- How to modify the material of the free modeling model
- How to design a shaped platform?
- How to draw arc in free modeling
- Tiling - How to Lay Tiles
- How to make tile parquet
- How to make ceramic tile corner cut mosaic
- How to design windmill tile
- How to conduct I-shaped tiling
- How to pave herringbone tile
- How to lay bricks with rounded corners
- How to lay bricks with rounded corners
- diamond tile paving
- Tile parquet explanation
- How to do I-shaped tile design
- Tiling - Q&A
- Why do render bricks reflect light?
- Why is the render brick texture unclear?
- Bricks in 3D state after brick paving are not displayed complete
- How to clear tiles quickly
- Do you have a tutorial for customized tiles?
- How to make a double wave line
- How to change tile size
- How to modify the tile grout joint material
- How to modify the tile grout joint size
- How to align the tile grout joint?
- How to rotate tiles?
- Copy tile
- How to group tiles
- When paving tiles how to set starting point?
- Export whole house tile floor plan
- How to pave tile to the exterior wall?
- How to add text and other annotations of the tiling floor plan
- How to pave tile to the exterior wall?
- How to change customized tile size
- Why can not select the brick?
- Why do render tiles reflect light?
- How to pave tiles continuous
- Why does the brick render black?
- Why do bricks flash and have shadows?
- Tiling - High Pressure Waterjet Processing Materials
- Tiling - Tile Area Design
- Practicality
- Construction design tips
- Material Brush for ustomized Models and Finished Product
- Wall material data synchronization
- One-click floor/wall paving
- Recess placement
- How to Tile Areas
- Where is the Decorative?
- Roof Balcony Design
- How to Remove Toe kick(aka skirting line)
- How to Quickly Find Finishing Materials
- How to Settings Library Ceiling Height
- Ceilings and Walls - Area Design
- Why can't the second ceiling layer be displayed in 3D after drawing the second layer ?
- How to generate a light trough
- How to make a chamfer on the wall
- How to get into the ceiling wall that you customed before and how to delete the customed wall/ceiling
- How to custom ceilings
- Ceiling CAD Drawings Export
- How to Add Light Strip to Double Layer Style Ceiling
- How to Draw a Circular Area
- How to import special shaped ceiling
- How to custom ceiling to the middle
- How to Go back to the Custom Mode for the Customed Ceiling or Delete it
- Gypsum Line Ceilings
- Ceiling and walls - Moldings
- How to modify the color of the light strip on the ceiling
- How to modify the position distance of the filler
- Tutorial for Customizing Guideline Lines to Create a Background Wall
- How to mirror the Filler
- Adding Metal Strip for Ceiling
- How to delete the Filler
- How to put the multi fillers
- Why the light strip on the ceiling show black in rendering
- How to add/modify light strips
- Ceiling and Walls - Uneven Design
- Array multi-panel&line in ceiling custom
- How to draw the staircase opening on the second floor
- How to Generate Unilateral Light Strip
- How to Draw Irregular Ceilings
- How to add light strips without plaster lines?
- How to Create Irregular Wall Shapes
- Tutorial for Making Ceilings to drop down
- How to set joint type for Integrated Wall Panel
- Tutorial for building a recessed ceiling in a 'return' shape”
- How to design a curved LED strip on the wall
- How to dig a hole in a wall
- How to make a sloping top
- How To Build Swimming Pool
- Tutorial for Grille Background Wall
- Ceilings and Walls - Q&A
- How to install downlights
- How to Delete Ceilings
- How to Convert the straight edge to arc edge in ceiling custom
- How to install the Dado
- Customized Ceiling How to modify the distance from the top
- How to install aluminum beam
- Tutorial for Arched Doorway in Background Wall
- How to Make Double-Layer Ceilings
- Why Ceilings Can't Be Filled
- How to deal with Black Shadow in Ceiling
- How to hide or modify the top molding and skirting line(aka toe kick)
- How to design lighting line on the wall
- Ceiling and Wall - Ceiling Panels
- How to increase the size of the gusset
- Why can't I see it after putting on Spotlight?
- How to change the material of the gusset?
- How to move the gusset
- How to rotate the gusset
- The difference between spaced paving and continuous paving
- How to arrange the gussets equally spaced
- Gusset rendering goes black
- Free Model - Q&A
- Set up account
- How to quote and export drawings
- Quote
- Blueprint
- How to export cabinet CAD drawings
- How to import CAD into the board for special-shaped modeling
- Where are the download drawings?
- How to Settings CAD Drawing Logo in Software
- How to export the model space drawing
- Ceiling drawing export
- One-click export of Tile flat drawings
- How to export CAD Construction drawings
- How to delete imported drawings
- How to download floor plan layout
How to design rectangular tiling areas
-
The steps to draw a rectangular area are as follows:
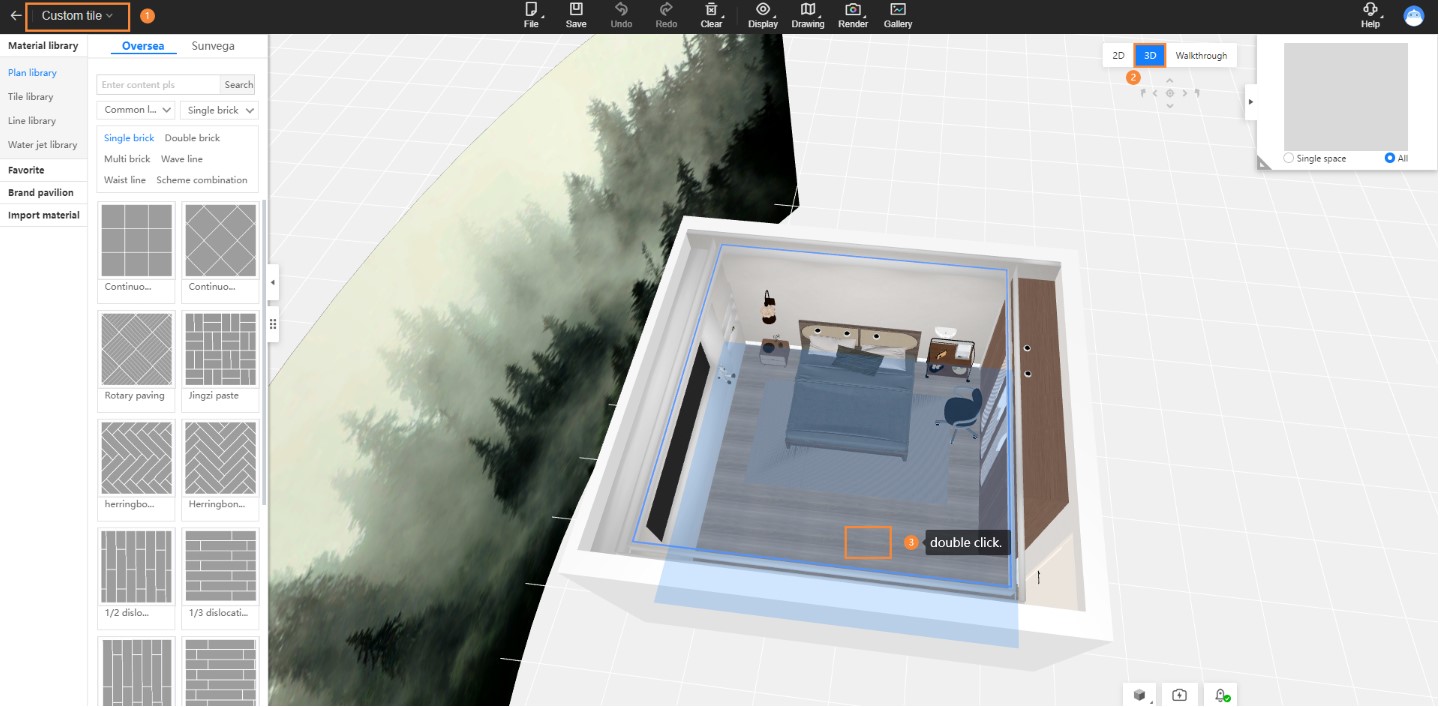
In the 3D/Wandering interface of the Custom Tiling module, right-click on the floor – select Add Tiling (Note: Double left-clicking can also enter the editing area);

-
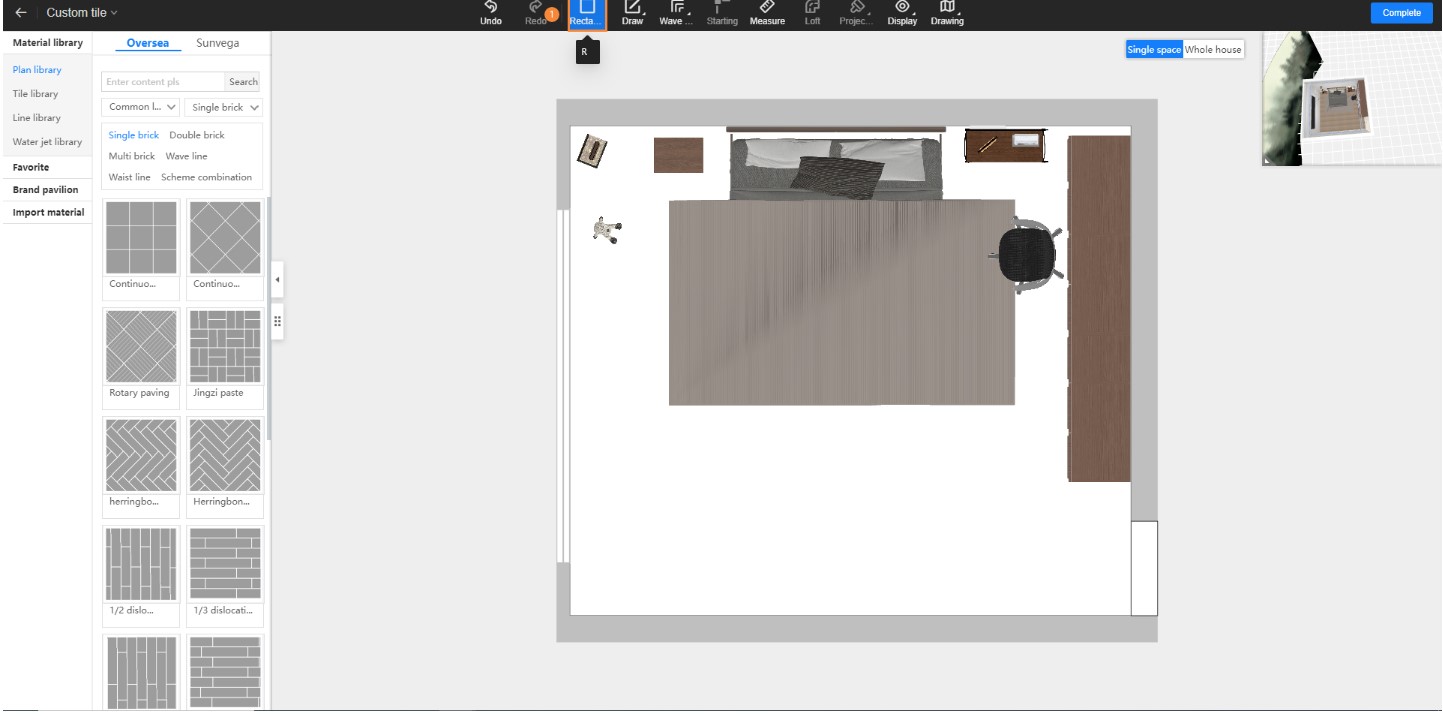
Enter the editing area – move the cursor to Draw Area at the top – click on Rectangle (Note: Directly select standard tiles, draw according to the tile positions, and set the starting point for drawing the rectangle);

-
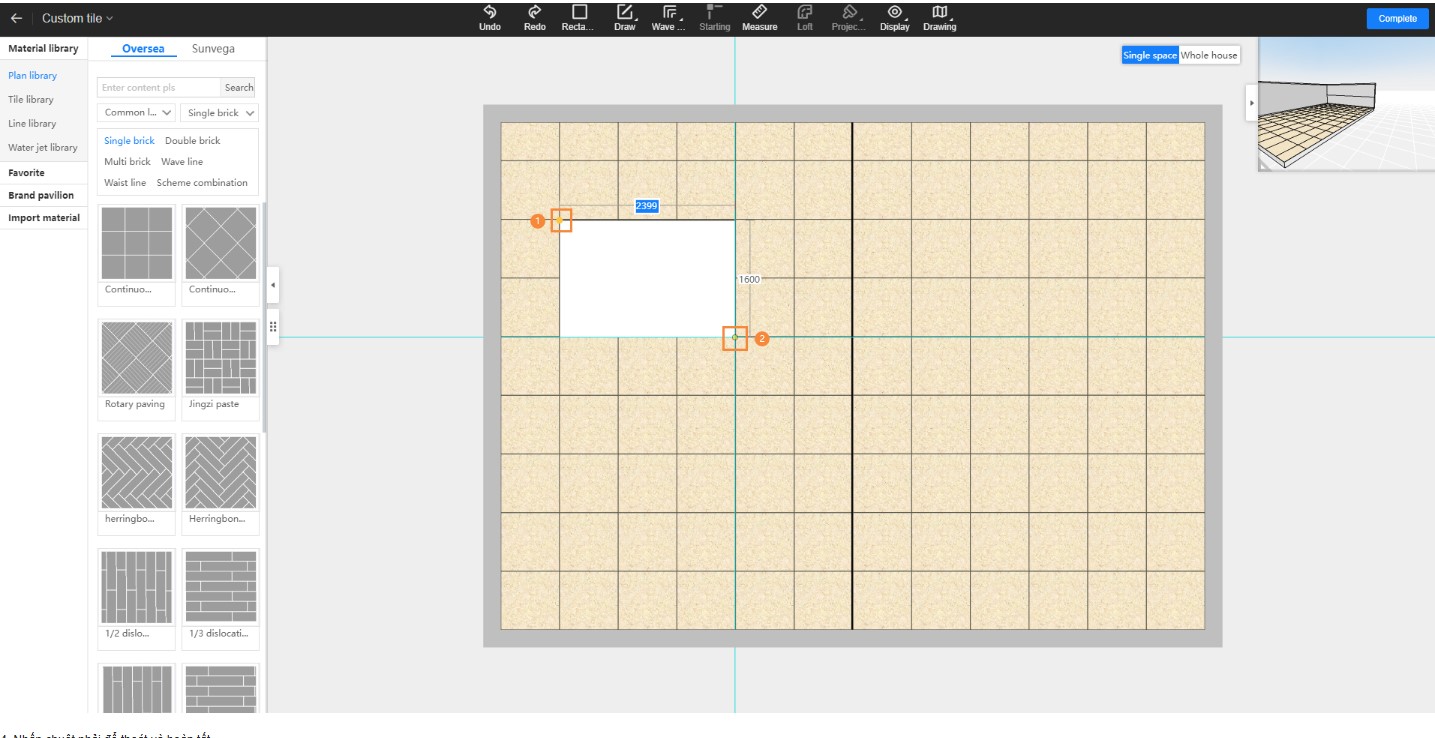
Click on the Starting Point with the mouse – then click on the End Point (Note: You can also directly input the dimensions using the computer keyboard);

-
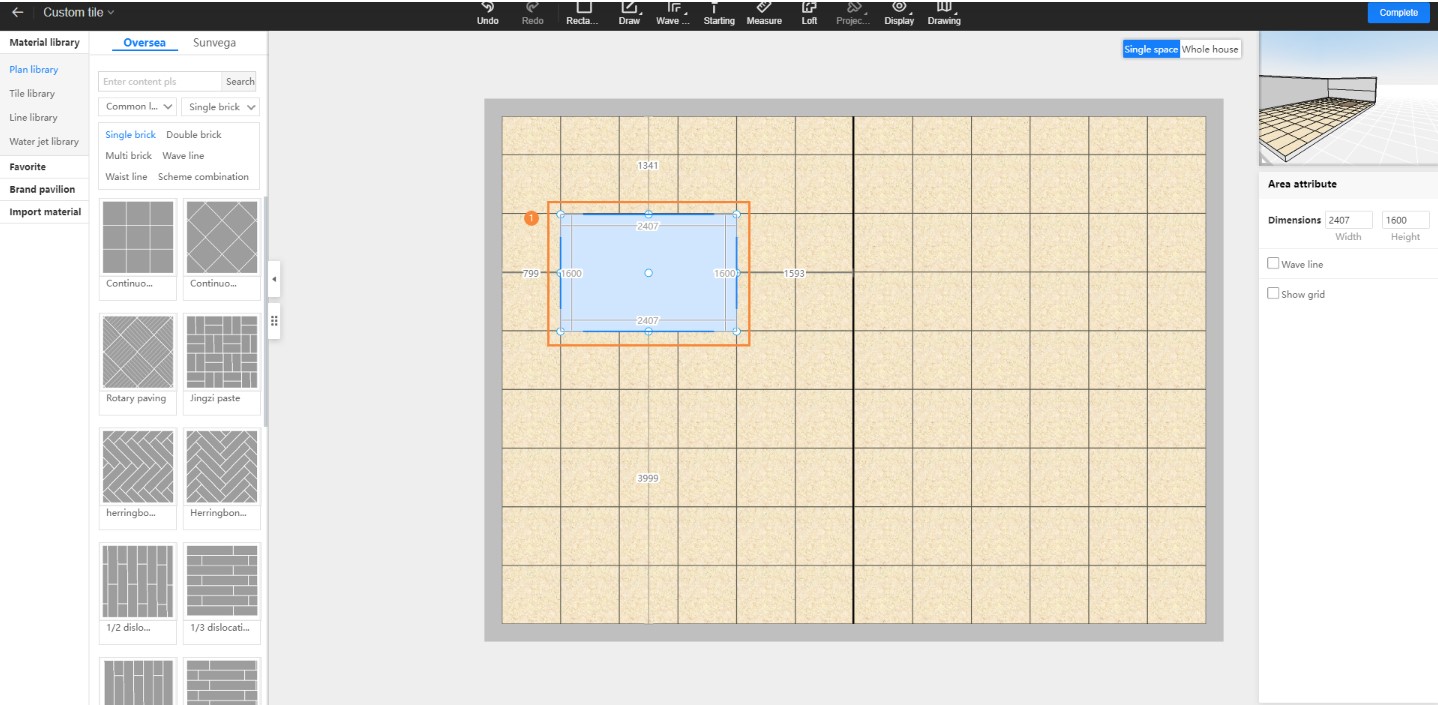
Right-click to exit and complete the process.


